
Short manual how to prepare Linux Qt5 image in ST Yocto
Assumption:
The tutorial is dedicated to Linux users
NOTE: The Following description based on the description from the manufacturer webpage
https://wiki.st.com/stm32mpu/index.php/STM32MP1_Distribution_Package
1. Create main directory for Yocto purposes
mkdir openstlinux-4.19-thud-mp1-19-02-20
2. Go to the created folder
cd openstlinux-4.19-thud-mp1-19-02-20
4. Initialize repo
repo init -u https://github.com/STMicroelectronics/oe-manifest.git -b refs/tags/openstlinux-5.4-dunfell-mp1-20-06-24
and synchronize repo
repo sync
In this place some modification in Yocto is necessary.
First open file
…/layers/meta-st/meta-st-stm32mp/conf/machine/include/st-machine-common-stm32mp.inc
and remove from line 141
openocd-stm32mp-native \
next remove from line 149
nativesdk-openocd-stm32mp \
Note: Removed “openocd” due to some problem with the package itself. For this purposes application “openocd” is not necessary.
and finally, remove from line 150
nativesdk-sdcard-raw-tools \
Store file after deletion.
Next open file
../layers/meta-st/meta-st-openstlinux/recipes-qt/qt5/files/qt-eglfs.sh
Add two lines after “export QT_QPA_PLATFORM=eglfs”
export QT_QPA_EGLFS_ALWAYS_SET_MODE="1"
export QT_QPA_EGLFS_INTEGRATION="eglfs_kms"
After modification store the file. The modified file should look like below
!/bin/sh -
 export QT_QPA_PLATFORM=eglfs
 export QT_QPA_EGLFS_ALWAYS_SET_MODE="1"
 export QT_QPA_EGLFS_INTEGRATION="eglfs_kms"
 if [ -e /usr/share/qt5/cursor.json ];
 then
         export QT_QPA_EGLFS_KMS_CONFIG=/usr/share/qt5/cursor.json
 fiN
Note: In the Latest systems discover a some problem with compilation so if find somewhere the following
...
error: ‘SIOCGSTAMP’ undeclared here (not in a function);
...
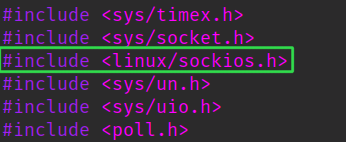
It is necessary to add some include in the file …/syscall.c
/home/mw/openstlinux-4.19-thud-mp1-19-02-20/build-openstlinuxeglfs-stm32mp1/tmp-glibc/work/x86_64-linux/qemu-native/3.0.0-r0/qemu-3.0.0/linux-user/syscall.c
To do this issue using ‘gedit’ or ‘nano’ or other editor
gedit /home/mw/openstlinux-4.19-thud-mp1-19-02-20/build-openstlinuxeglfs-stm32mp1/tmp-glibc/work/x86_64-linux/qemu-native/3.0.0-r0/qemu-3.0.0/linux-user/syscall.c
and add #include <linux/sockios.h>
5. Choose DISTRO. Valid DISTRO for QT5 purpose is
DISTRO=openstlinux-eglfs MACHINE=stm32mp1 source layers/meta-st/scripts/envsetup.sh
NOTE: Accept all necessary agreements
6. When DISTRO is chosen it is a good time to start compile QT5 image for STM32MP1
bitbake st-example-image-qt
7. After a couple of hours, 😉 the image should be ready
8. Create image for SD-Card using a dedicated script. So go to
cd tmp-glibc/deploy/images/stm32mp1/scripts
the folder and execute the following command to generate *.raw file for SD-Card
./create_sdcard_from_flashlayout.sh ../flashlayout_st-example-image-qt/FlashLayout_sdcard_stm32mp157c-dk2-optee.tsv
9. Afterimage generation script suggests how to write an image to SD-Card.
sudo dd if=../flashlayout_st-example-image-qt/../flashlayout_st-example-image-qt_FlashLayout_sdcard_stm32mp157c-dk2-optee.raw of=/dev/mmcblk0 bs=8M conv=fdatasync status=progress
NOTE: Only thing to do is replace if necessary of=/dev/mmcblk0 to of=/dev/sdx for instance. Be aware wrong specification of “of=/dev/..” can damage Your local system, check twice !. To check where the SD-Card is connected “df -h” command can be useful
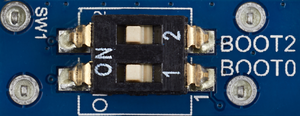
10. Insert SD-Card into SD-Card slot in development board and check if boot pins are configured as follow
11. Connect USB C wire located near distance of SD-CARD slot. System should start
12. Connect ethernet wire to ethernet connector and check its IP address.
13. Using ssh login on to the board
ssh 192.168.x.y -l root
NOTE: Accept key
14. Remove “psplash-drm service permanently to be able to run QT5 application. To do this issue following commands
systemctl stop psplash-drm-start
systemctl disable psplash-drm-start
systemctl daemon-reload
systemctl reset-failed
15. Next, compile QT5 toolchain in Yocto. Go back again to main Yocto build folder
cd ~/openstlinux-4.19-thud-mp1-19-02-20/build-openstlinuxeglfs-stm32mp1
and execute toolchain generation. This process can take a lot of hours.
bitbake meta-toolchain-qt5
NOTE: During compilation some WARNINGS can appears
16. Next step is install SDK into the system. Go to directory
cd tmp-glibc/deploy/sdk/
./meta-toolchain-qt5-openstlinux-eglfs-stm32mp1-x86_64-toolchain-2.6-snapshot.sh
Note: Accept all agreements and choose default proposed installation place
17. When installation finished created on Your desktop two files
activator stm32_qtcreator and stm32_qtcreator.sh
stm32_qtcreator content
!/usr/bin/env xdg-open
 [Desktop Entry]
 Version=1.0
 Type=Application
 Terminal=false
 Icon[pl_PL]=gnome-panel-launcher
 Name[pl_PL]=stm32_qtcreator
 Exec=/home/mw/Pulpit/stm32_qtcreator.sh
 Name=stm32_qtcreator
stm32_qtcreator.sh content
!/bin/bash
 . /opt/st/stm32mp1/2.6-snapshot/environment-setup-cortexa7t2hf-neon-vfpv4-openstlinux_eglfs-linux-gnueabi
 /opt/Qt5.12.0/Tools/QtCreator/bin/qtcreator
Use activator stm32_qtcreator to open QTCreator application. This process is necessary because “. /opt/st/stm32mp1/2.6-snapshot/environment-setup-cortexa7t2hf-neon-vfpv4-openstlinux_eglfs-linux-gnueabi” set all necessary export, path etc. demanded by QTCreator to proper make a cross-compilation.
18. The Last thing to do is create Kit for STM32 into QTCreator application